웹 어플리케이션을 개발하다보면 회원인증, 접근권한 관련하여 고민하게 됩니다.
직접 관련로직을 구현하다 보면 누락이 생기기도 하고, 관리도 힘들어 지기도 하고…
그래서 이런 인증과 권한을 관리하기 위해 JAAS, Spring Security, Apache Shiro 등 여러 Java프레임워크가 존재하는데 그 중 Spring Security에 대해서 알아보고자 합니다.
Authentication
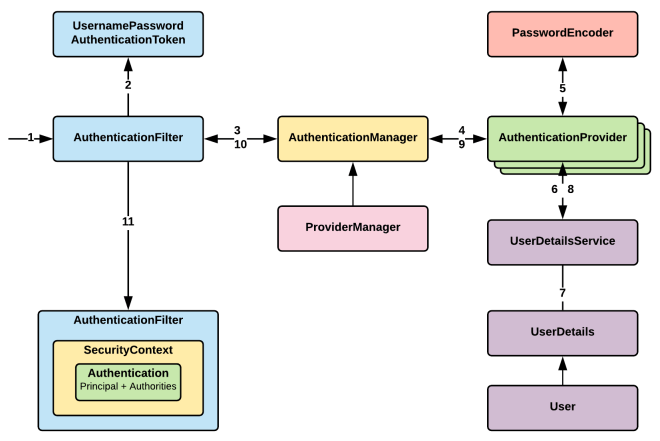 Spring Security의 대략적인 구조는 아래와 같습니다.
1 사용자 인증 요청
2 사용자 자격 증명 (아이디, 패스워드) 기반으로 Authentication Token 생성
3 인증을 위해 AuthenticationManager에 Authentication Token을 전달받아, authenticate 메소드를 호출
4 AuthenticationManager를 구현한 AuthenticationProvider에서 실제 인증 처리를 진행.
5 비밀번호 암호화 인터페이스, 패스워드 비교
6 ~ 8 사용자 정보 인터페이스, DB에서 사용자 정보를 반환
9 ~ 10 인증 및 사용자 정보가 포함된 Authentication을 반환
11 SecurityContext에 Authentication 저장 후 인증 완료 처리
설치
Maven, Gradle 같은 빌드 도구를 이용하여 설치를 진행합니다. Spring Boot + Maven (pom.xml)
<dependencies>
  <!-- ... other dependency elements ... -->
  <dependency>
    <groupId>org.springframework.boot</groupId>
    <artifactId>spring-boot-starter-security</artifactId>
  </dependency>
</dependencies>
Maven (pom.xml)
<dependencies>
<!-- ... other dependency elements ... -->
  <dependency>
    <groupId>org.springframework.security</groupId>
    <artifactId>spring-security-web</artifactId>
    <version>5.1.5.RELEASE</version>
  </dependency>
  <dependency>
    <groupId>org.springframework.security</groupId>
    <artifactId>spring-security-config</artifactId>
    <version>5.1.5.RELEASE</version>
  </dependency>
</dependencies>
Gradle + Spring Boot (build.gradle)
dependencies {
  compile "org.springframework.boot:spring-boot-starter-security"
}
Gradle (build.gradle)
dependencies {
  compile 'org.springframework.security:spring-security-web:5.1.5.RELEASE'
  compile 'org.springframework.security:spring-security-config:5.1.5.RELEASE'
}
Java Configuration
Spring Framework 3.1 버전 부터 Java Configuration이 추가되어, Spring Security 3.2버전부터는 사용자가 XML을 사용하지 않고도 Annotation을 통해 쉽게 설정이 가능합니다.
우선 아래와 같이 기본적인 Configuration을 생성해 봅니다.
import org.springframework.beans.factory.annotation.Autowired;

import org.springframework.context.annotation.*;
import org.springframework.security.config.annotation.authentication.builders.*;
import org.springframework.security.config.annotation.web.configuration.*;

@EnableWebSecurity
public class WebSecurityConfig implements WebMvcConfigurer {

  @Bean
  public UserDetailsService userDetailsService() throws Exception {
    InMemoryUserDetailsManager manager = new InMemoryUserDetailsManager();
    manager.createUser(User.withDefaultPasswordEncoder().username("user").password("password").roles("USER").build());
    return manager;
  }
}
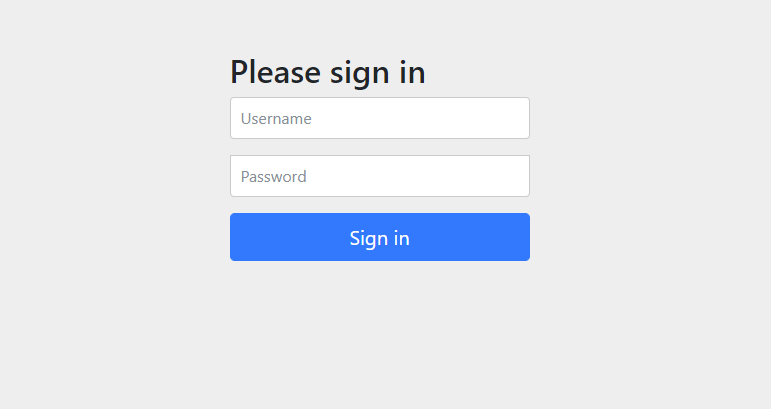
위와 같이 Configuration 생성 후 페이지에 접근을 하면 아래와 같은 로그인 화면이 보여지게 됩니다.
위와 같은 Configuration 생성한 것 만으로 아래와 같이 많은 기능을 제공합니다.
- 모든 URL에 접근시 인증 필요하도록 설정
- ID, 패스워드 기반 유저 인증 로직 제공
- 로그인, 로그아웃 로직 구현
- CSRF, session fixation 공격 방어등 보안기능 제공
HttpSecurity
이제 WebSecurityConfigurerAdapter를 상속받아 인증로직을 구현 할 차례입니다. configure 메소드가 WebSecurityConfigurerAdapter 안에 아래와 같이 기본적으로 설정이 되어 있습니다.
import org.springframework.beans.factory.annotation.Autowired;

import org.springframework.context.annotation.*;
import org.springframework.security.config.annotation.authentication.builders.*;
import org.springframework.security.config.annotation.web.configuration.*;

@EnableWebSecurity
public class WebSecurityConfig extends WebSecurityConfigurerAdapter implements WebMvcConfigurer {

  // ...

  protected void configure(HttpSecurity http) throws Exception {
    http
        .authorizeRequests()
            .anyRequest().authenticated()
            .and()
        .formLogin()
            .and()
        .httpBasic();
  }
}
로그인 설정
protected void configure(HttpSecurity http) throws Exception {
    http
        .authorizeRequests()
            .anyRequest().authenticated()
            .and()
        .formLogin()
            .loginPage("/login")
            .permitAll();
}
- .loginPage(“/login”) : 로그인 URL을 정의 합니다.
- .permitAll(); : 모든 사용자가 접근을 허용하도록 설정합니다.
페이지별로 접근 권한을 설정
protected void configure(HttpSecurity http) throws Exception {
    http
        .authorizeRequests()
            .antMatchers("/resources/**", "/signup", "/about").permitAll()
            .antMatchers("/admin/**").hasRole("ADMIN")
            .antMatchers("/db/**").access("hasRole('ADMIN') and hasRole('DBA')")
            .anyRequest().authenticated()
            .and()
        // ...
        .formLogin();
}
- .antMatchers() : 해당 페이지에 접근시
- .hasRole(), hasAuthority() : 특정 권한을 가진 사용자만 접근 가능합니다.
- .access() : SpEL 표현식에 설정에 따라 접근을 허용합니다.
로그아웃 설정
protected void configure(HttpSecurity http) throws Exception {
    http
        .logout()
            .logoutUrl("/my/logout")
            .logoutSuccessUrl("/my/index")
            .logoutSuccessHandler(logoutSuccessHandler)
            .invalidateHttpSession(true)
            .addLogoutHandler(logoutHandler)
            .deleteCookies(cookieNamesToClear)
            .and()
        ...
}
- .logoutUrl() : 로그아웃 URL을 정의 합니다.
- .logoutSuccessUrl() : 로그아웃 후 리다이렉트 URL을 정의 합니다.
- .logoutSuccessHandler : 사용자 정의 LogoutSuccessHandler를 정의합니다. 설정 시 ogoutSuccessUrl() 이 무시됩니다.
- .invalidateHttpSession() : 로그아웃 시 Session을 무효화 할지 여부를 정의합니다.
- .deleteCookies : 로그아웃 시 제거할 쿠키명을 지정합니다.
마치며
레퍼런스에 나와있는 기본적인 내용에 대해서 알아보았습니다.
다음에는 실제 적용 사례, OAuth 등에 관하여 알아보고자 합니다.