시작하며
이 포스트는 spring boot oauth2 를 사용하여 빠르게 소셜 로그인(github, google)을
적용할수 있는 방법에 대해서 기술하도록 한다.
참고로 oauth2에 대한 개념은 다른 여러 사이트에서 자세히 나와 있으니 참고 하거나,
여기에서 개념 확인이 가능하다.
spring boot 설정
프로젝트 생성
우선 https://start.spring.io 로 이동하여 빈 프로젝트를 만들자.
만들때 WEB을 종속성으로 추가하자.
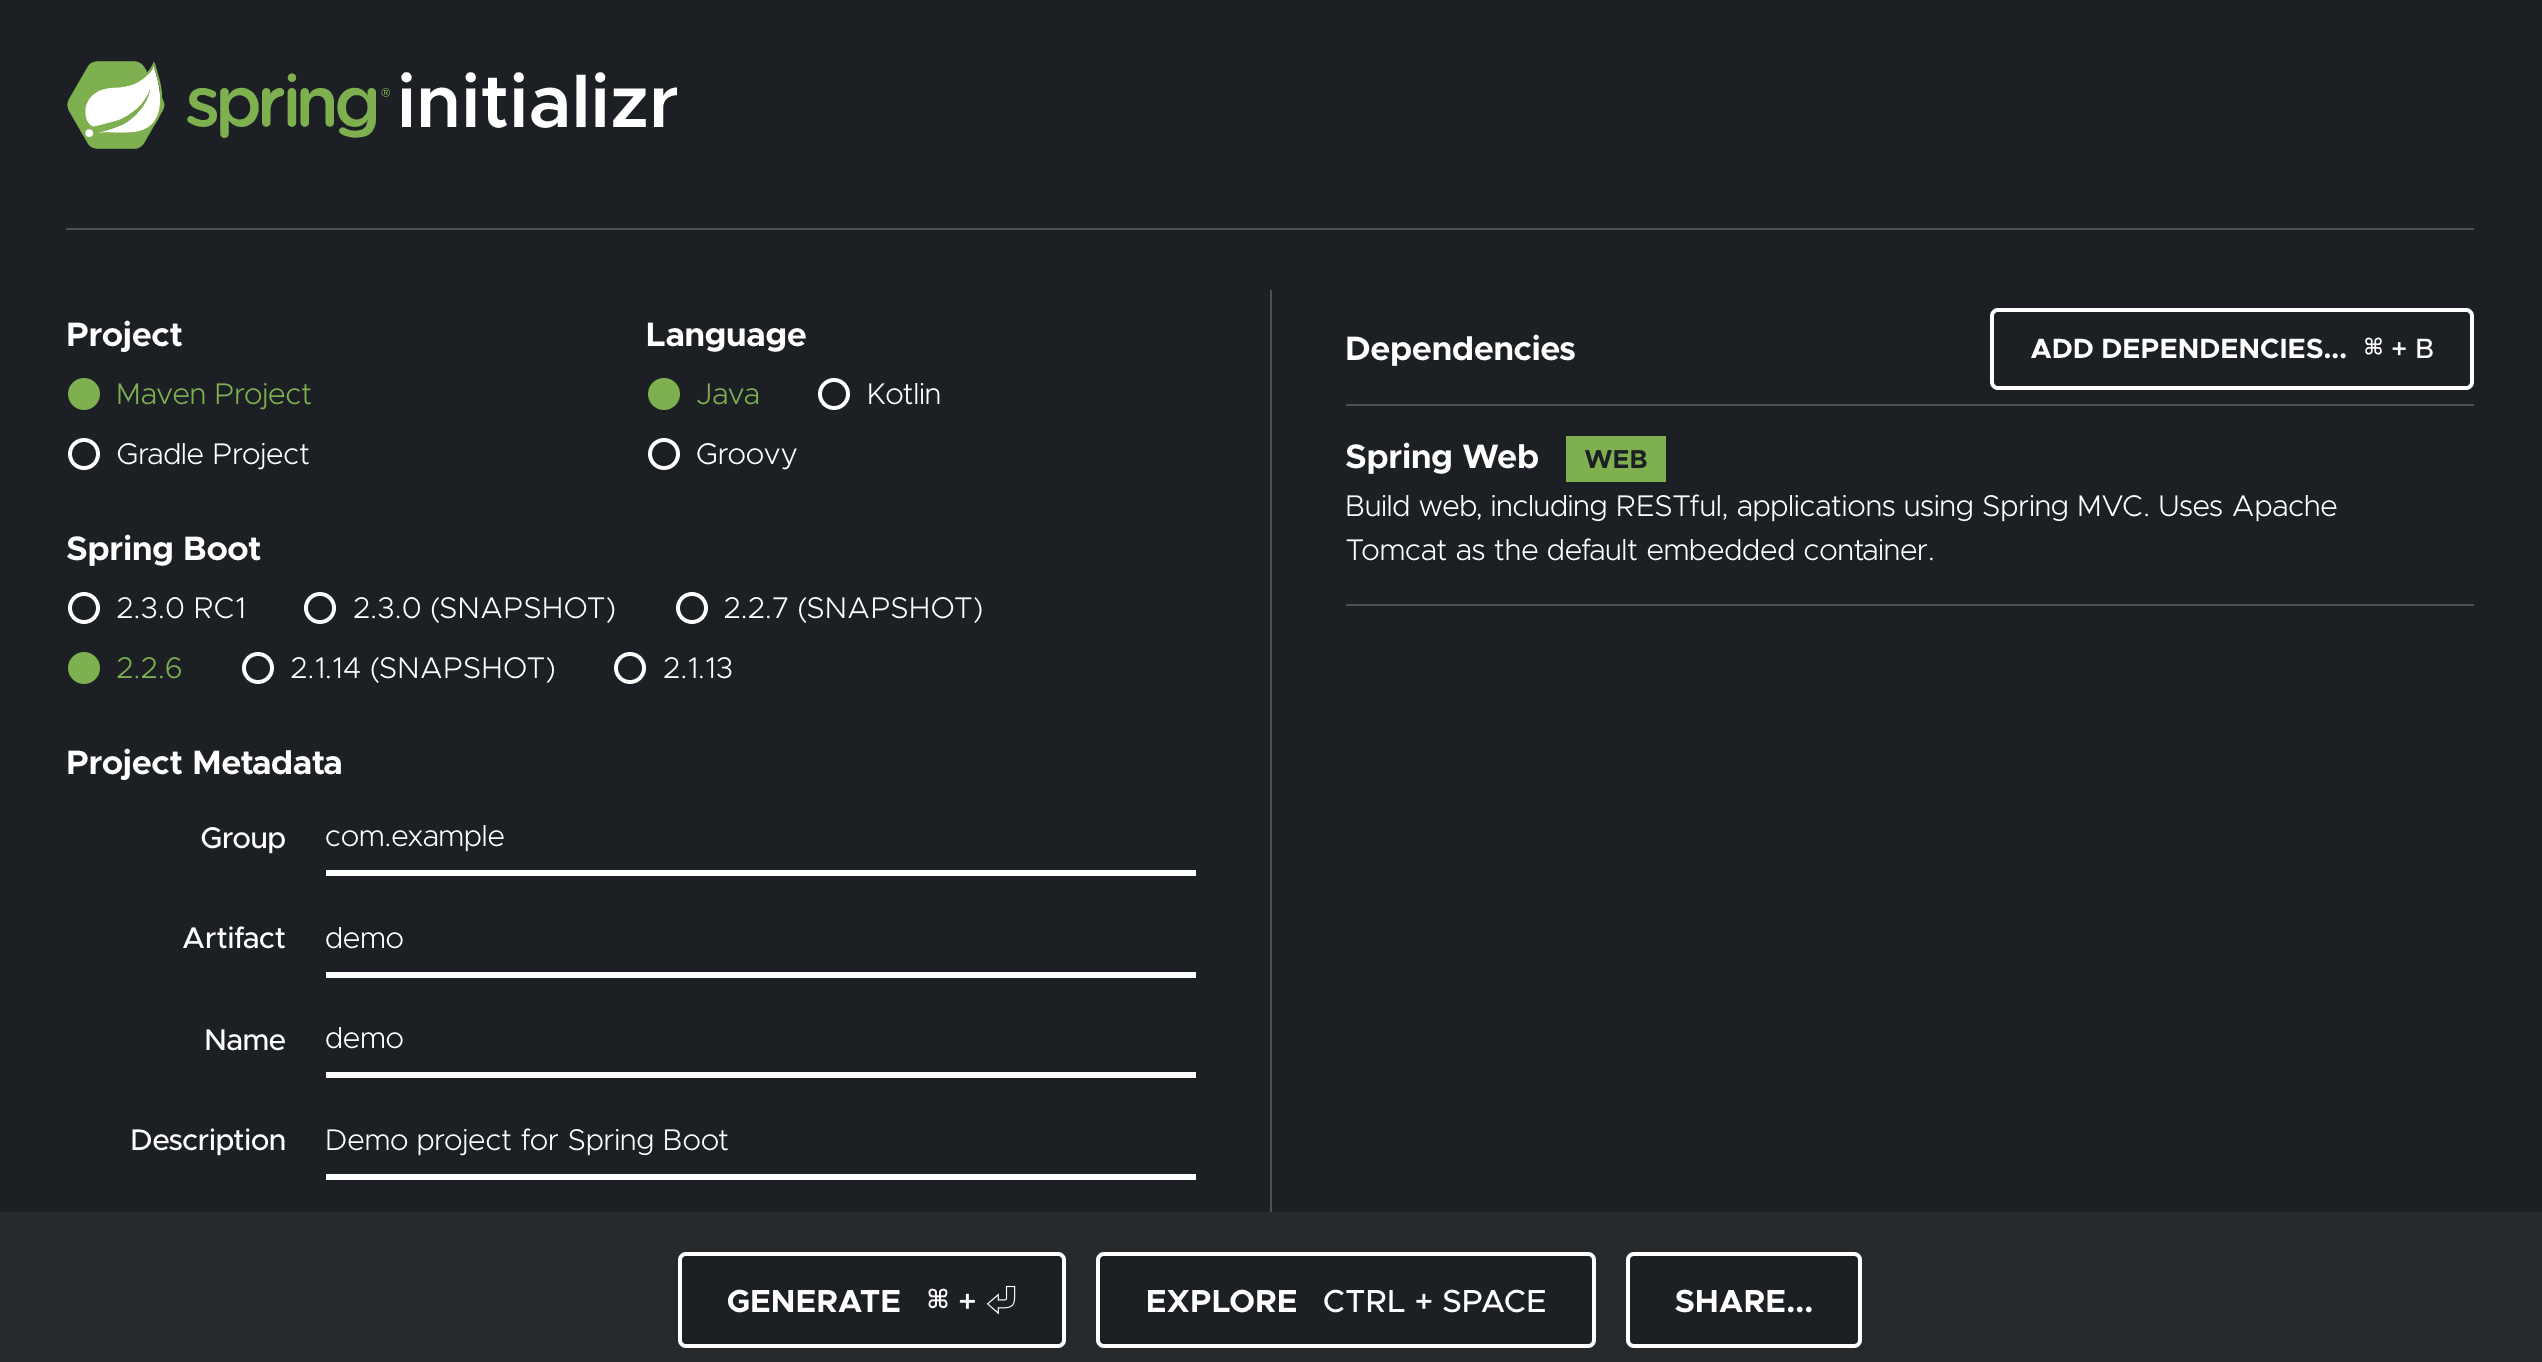
그 다음 선호하는 IDE를 열어 위에 만든 프로젝트를 연다.
편의를 위해 pom.xml에 jQuery와 Bootstrap을 종속성에 추가한다.
<dependency>
	<groupId>org.webjars</groupId>
	<artifactId>jquery</artifactId>
	<version>3.4.1</version>
</dependency>
<dependency>
	<groupId>org.webjars</groupId>
	<artifactId>bootstrap</artifactId>
	<version>4.3.1</version>
</dependency>
<dependency>
	<groupId>org.webjars</groupId>
	<artifactId>webjars-locator-core</artifactId>
</dependency>
간단하게 index.html 을 꾸며 보자.
src/main/resources/static 폴더를 만들고, index.html 을 생성한다.
(spring boot 에서는 default 로 /resources/static 폴더가 있을시, 자동으로 그 폴더를 정적 페이지로 인식한다.)
기능은 없고, 단순이 jquery랑 bootstrap을 로딩하는 단순 html 페이지이다.
<!doctype html>
<html lang="en">
<head>
    <meta charset="utf-8"/>
    <meta http-equiv="X-UA-Compatible" content="IE=edge"/>
    <title>Demo</title>
    <meta name="description" content=""/>
    <meta name="viewport" content="width=device-width"/>
    <base href="/"/>
    <link rel="stylesheet" type="text/css" href="/webjars/bootstrap/css/bootstrap.min.css"/>
    <script type="text/javascript" src="/webjars/jquery/jquery.min.js"></script>
    <script type="text/javascript" src="/webjars/bootstrap/js/bootstrap.min.js"></script>
</head>
<body>
	<h1>Demo</h1>
	<div class="container"></div>
</body>
</html>
자 여기까지 기본적인 세팅이 되었으면, 애플리케이션을 구동해서 http://localhost:8080 을 실행해보자.

Spring Security
애플리케이션을 안전하게하기 위해 Spring Security를 종속성으로 추가한다.
소셜 로그인을 하고자하므로 Spring Security OAuth 2.0 클라이언트 스타터를 포함해야 한다.
pom.xml에 추가해 준다.
<dependency>
	<groupId>org.springframework.boot</groupId>
	<artifactId>spring-boot-starter-oauth2-client</artifactId>
</dependency>
이를 추가하면 기본적으로 OAuth 2.0으로 앱을 보호한다.
기본적으로 앱을 보호한다고?? 실제로 OAuth 2.0 클라이언트 스타터를 추가 후 http://localhost:8080 을 실행해보면,
갑자기 로그인 페이지로 이동할 것이다.
이유는 인증없이 index.html로 접근하여, spring security에서 강제적으로 인증없는 요청은 로그인창으로 넘겼기 때문이다.
이제 앞으로 이러한 인증을 소셜 로그인 인증으로 바꿀 예정이다.
Github 로그인 연동
로그인에 GitHub의 OAuth 2.0 인증 시스템을 사용하려면 먼저 새 GitHub 앱을 추가 해야한다.
github에서 앱을 추가하는 설명은 넘어가도록 하겠다.
다만 github 앱에서 콜백 URL은 http://localhost:8080/login/oauth2/code/github 로 등록해 둔다.
쉽게 말해 github에서 로그인 인증이 완료되면, 리다이렉트되는 URL 이다. 이 리다이렉트 된 URL에서 github에 대한
인증 정보를 취득하고, 그 인증정보를 기반으로 사용자 정보 조회등이 이루어 질수 있다.
기본 리디렉션 URI 템플릿은 {baseUrl}/login/oauth2/code/{registrationId} 이다. registrationId는 giihub, google, facebook 등 third party의 고유 식별자이다.
그럼 다음, GitHub앱에서 발급된 클라이언트 id, 클라이언트 Secret을 우리 앱 application.properties에 설정을 한다.
spring.security.oauth2.client.registration.github.clientId=발급된 클라이언트 id
spring.security.oauth2.client.registration.github.clientSecret=클라이언트 Secret
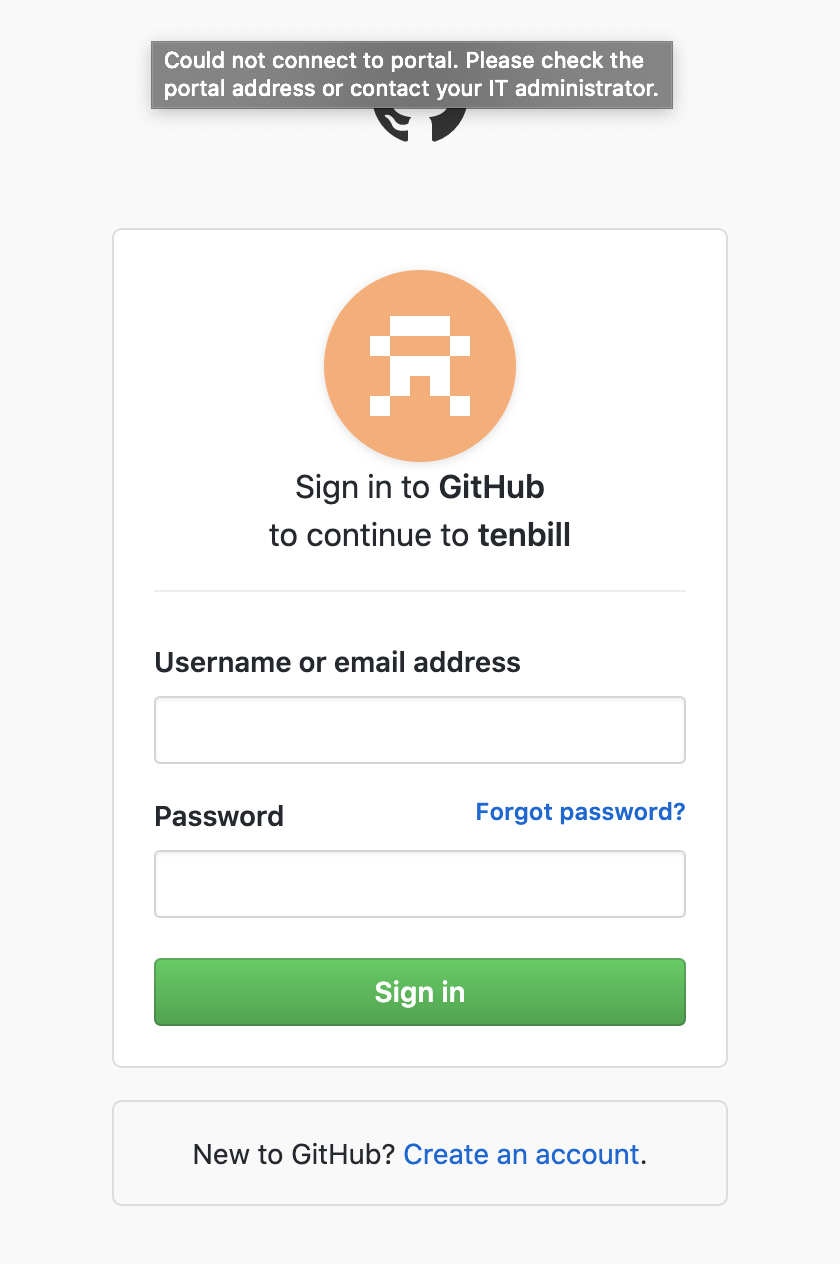
앱을 다시 실행하고 http://localhost:8080 로 다시 접근하면, 이제 홈페이지 대신 GitHub로 로그인하도록 리디렉션이 자동으로 된다.
그렇게하고 승인 요청을 수락하면 로컬 앱으로 다시 리디렉션되고 홈 페이지가 표시된다.
어떤한 일이 일어난거지?
음? application.properties에 클라이언트 id 와 secret key 만 세팅 했을 뿐인데, 어떻게 github 로그인창으로 넘어갔지?
방금 일어난 일을 좀 살펴보자.
위에서 확인했듯이 localhost:8080으로 접근시, 인증된게 없으니 스프링 시큐리티에서 자동으로 인증창을 띄우는데, application.properties에 설정된 값이 없으면, 내부 default 인증창을 띄우게 되고, 설정된 값이 있으면, 그 설정된 값에 준하는 액션들을 스프링에서 자동으로 수행한다.
org.springframework.security.config.oauth2.client.CommonOAuth2Provider
를 보면, 각 벤더사에 따라 기본 설정들이 세팅되어 있다.
GOOGLE {
        public Builder getBuilder(String registrationId) {
            Builder builder = this.getBuilder(registrationId, ClientAuthenticationMethod.BASIC, "{baseUrl}/{action}/oauth2/code/{registrationId}");
            builder.scope(new String[]{"openid", "profile", "email"});
            builder.authorizationUri("https://accounts.google.com/o/oauth2/v2/auth");
            builder.tokenUri("https://www.googleapis.com/oauth2/v4/token");
            builder.jwkSetUri("https://www.googleapis.com/oauth2/v3/certs");
            builder.userInfoUri("https://www.googleapis.com/oauth2/v3/userinfo");
            builder.userNameAttributeName("sub");
            builder.clientName("Google");
            return builder;
        }
    },
    GITHUB {
        public Builder getBuilder(String registrationId) {
            Builder builder = this.getBuilder(registrationId, ClientAuthenticationMethod.BASIC, "{baseUrl}/{action}/oauth2/code/{registrationId}");
            builder.scope(new String[]{"read:user"});
            builder.authorizationUri("https://github.com/login/oauth/authorize");
            builder.tokenUri("https://github.com/login/oauth/access_token");
            builder.userInfoUri("https://api.github.com/user");
            builder.userNameAttributeName("id");
            builder.clientName("GitHub");
            return builder;
        }
    },
방금 작성한 OAuth 2.0 로 작성된 앱은 클라이언트 애플리케이션 이며 GitHub (권한 부여 서버)에서
액세스 코드 를 얻기 위해 인증 코드 부여 를 사용한다.
그런 다음 액세스 토큰을 사용하여 로그인 ID 및 이름을 포함하여 GitHub에 개인 정보 (허용 한 것만)를 요청한다.
이 단계에서 GitHub는 리소스 서버 역할을하며, 전송 한 토큰을 해독하고 앱에 사용자 세부 정보에 액세스 할 수있는 권한이 있는지 확인한다.
해당 프로세스가 성공하면 앱은 사용자 세부 정보를 Spring Security 컨텍스트에 삽입하여 인증되도록 한다.
이 모든 과정이 application.properites 설정하나로 자동으로 이루어 졌다.
다만 개인적인 생각으로는 이렇게 기본적으로 제공되는 일련의 모든 과정들이 숨겨져 있어, 콜백 URL 변경이나 네이버 카카오 등 국내 기업의 oauth 연동을 위한 커스터마이징 작업에 리서치하는 시간이 꽤 들것 같다.
조금 더 그럴듯 하게 바꾸어 보자.
인증값이 없으면 자동으로 giihub로 리다이렉트 되는거 말고, 몬가 그럴듯하게? 클릭하면 로그인이 되고,
로그인이 되면 실제 github에서 가져온 데이터들을 보여주는 걸 해보자.
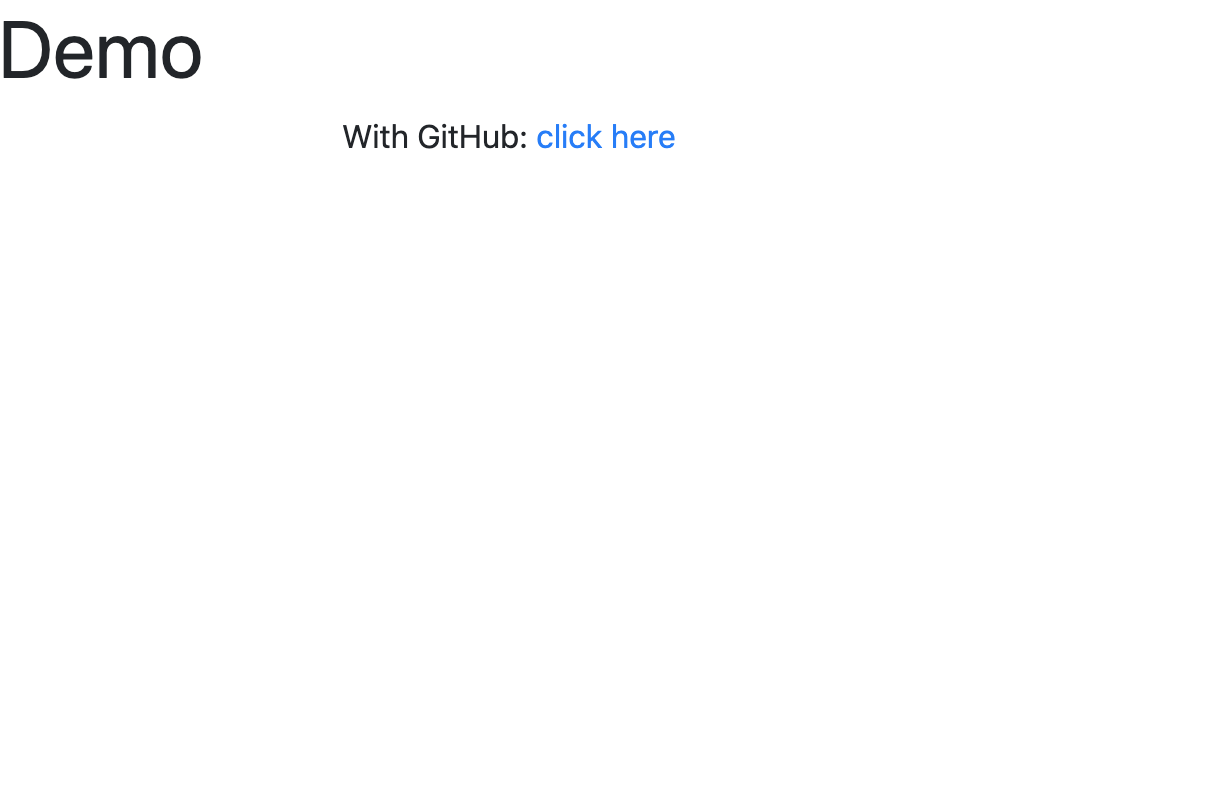
먼저 index.html 을 수정하자.
<div class="container unauthenticated">
With GitHub: <a href="/oauth2/authorization/github">click here</a>
</div>
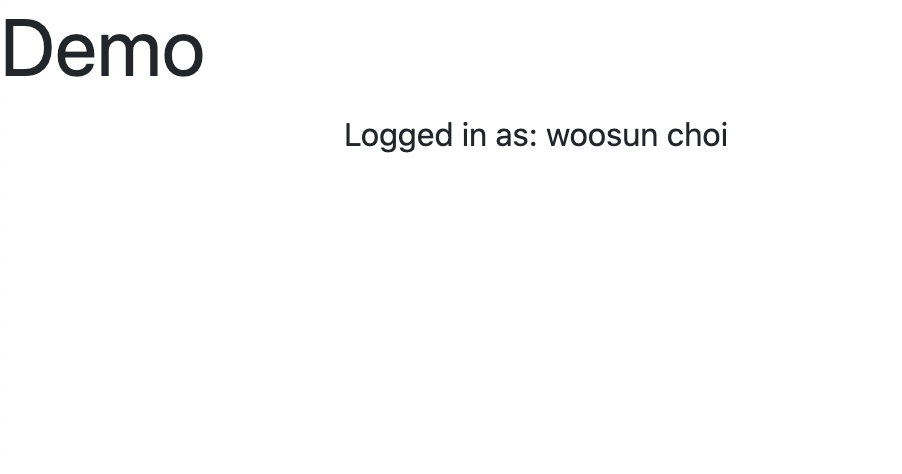
<div class="container authenticated" style="display:none">
Logged in as: <span id="user"></span>
</div>
<script type="text/javascript">
$.get("/user", function(data) {
$("#user").html(data.name);
$(".unauthenticated").hide()
$(".authenticated").show()
});
</script>
javascript로 작성된 부분을 보면 /user 엔드 포인트로 사용자 정보를 획득하는걸 볼수 있다.
자 이제 /user 엔드포인트를 작성해보자.
DemoApplication.java에 아래와 같이 작성한다.
@SpringBootApplication
@RestController
public class DemoApplication {

    @GetMapping("/user")
    public Map<String, Object> user(@AuthenticationPrincipal OAuth2User principal) {
        return Collections.singletonMap("name", principal.getAttribute("name"));
    }

    public static void main(String[] args) {
        SpringApplication.run(DemoApplication.class, args);
    }

}
마지막으로 접근 제한 설정
이제 만든 앱은 이제 정상적으로 작동하고 이전과 같이 인증되지만 페이지를 표시하기 전에 여전히 리디렉션 되고 있다.
리다이렉션이 자동으로 안되고 우리가 만든 index.html이 노출되려면 WebSecurityConfigurerAdapter을 다음과 확장하여 홈 페이지의 보안을 해제해야 한다.
@SpringBootApplication
@RestController
public class DemoApplication extends WebSecurityConfigurerAdapter {

    // ...

    @Override
    protected void configure(HttpSecurity http) throws Exception {
    	// @formatter:off
        http
            .authorizeRequests(a -> a
                .antMatchers("/", "/error", "/webjars/**").permitAll()
                .anyRequest().authenticated()
            )
            .exceptionHandling(e -> e
                .authenticationEntryPoint(new HttpStatusEntryPoint(HttpStatus.UNAUTHORIZED))
            )
            .oauth2Login();
        // @formatter:on
    }

}
위 설정을 간략히 설명하면,
/ 이 페이지는 방금 동적으로 만든 페이지이므로 인증없이 사용자가 볼 수 있어야 한다.
/error 오류를 표시하는 Spring Boot 엔드 포인트이므로 접근이 가능해야 한다.
/webjars/** 는 인증 여부에 관계없이 모든 방문자에게 JavaScript를 실행해야 하기 때문에 허용한다.
그러나 /user 엔드포인트는 인증이 필요함으로 설정에 빠져 있다.
자 http://localhost:8080을 실행해보자.
click here 을 눌러보자.
github를 로그인 해보자.
github를 로그인 하면 우리가 github 앱에서 설정한 콜백 URL http://localhost:8080/login/oauth2/code/github 로
리다이렉트 되며 콜백 URL에서 인증키 값을 얻고, 원래 index.html 로 돌아와 javascript의 ajax가 실행되어 /user 를 조회하게 된다.
그런데 github에서 어떻게 내 유저정보를 가져왔을까? 그러한 작업은 한적이 없는데 말이다..
이 부분도 default로 스프링에서 기본적으로 해주고 있다.
따라서 커스터마이징(콜백 URL 변경, 유저조회 등등)이 필요하면 별도로 작업을 해주어야 한다.
google 소셜 로그인 연동
github를 해봤으니, google은 껌이다. 똑같이 하면 된다..
똑같이 application.properties에 클라이언트 정보를 추가한다.(구글 앱 설정은 별도 설명하지 않는다.)
spring.security.oauth2.client.registration.google.clientId=발급된 클라이언트 id
spring.security.oauth2.client.registration.google.clientSecret=클라이언트 Secret
구글 앱 설정에서 리다이렉트 URL은 github와 동일하게 http://localhost:8080/login/oauth2/code/google 게 설정한다.
그리고 index.html에서 구글 로그인 버튼만 추가하면 완성!!
<div class="container unauthenticated">
  <div>
    With GitHub: <a href="/oauth2/authorization/github">click here</a>
  </div>
  <div>
    With Google: <a href="/oauth2/authorization/google">click here</a>
  </div>
</div>
마치며
소셜 로그인은 이제 필수가 되어 버렸는데, 의외로 매우 간단하지 만은 않다.
위 예제는 스프링 oauth2에서 거의 대부분 자동으로 지원해 주고 있고, 왠만한 큰 벤더사들은
단순 설정만으로 로그인 구현이 가능하다.
다만 위에서 언급했듯이, 네이버나 카카오 등 국내 기업의 소셜 로그인은 별도의 커스터마이징이 필요함으로
이 부분은 작업할때 의외로 적지 않은 노력?이 필요 할수도 있다.
또한 소셜 로그인 이후의 앱 쿠키 정책이나 JWT 등의 변환등으로 인증 체제를 커스터 마이징 하면 각 시스텡에 맞는 소셜 로그인 인증을 만들수 있을 것이다.
참고 사이트
- https://spring.io/guides/tutorials/spring-boot-oauth2/
- https://spring.io/guides/tutorials/spring-security-and-angular-js/